With StudioEdge™ you can very easily introduce high-quality isolated Zoom callers with discrete audio into your productions. Through QuickLink's partnership with Zoom, it is now possible to seamlessly integrate the highest-quality, 1080p Full-HD Zoom callers into StudioEdge. This article is a step-by-step guide on the initial prerequisites required and how to introduce Zoom callers into StudioEdge.
Prerequisites
Before introducing Zoom callers, you will need to apply a setting within your Zoom account settings that enables StudioEdge to connect to Zoom meetings successfully. To achieve this follow this article here.
Initiating a Zoom Call
The first thing you will need to do is log in to the StudioEdge portal (edge.quicklink.network) and connect to the StudioEdge device you wish to use. If you are unsure on how to do this, please refer to the Quick Start Guide to QuickLink StudioEdge article.
To add a Zoom caller, click the call button ( ), then select Zoom from the available platforms.
If you haven't used Zoom previously, you will first need to give StudioEdge the required permissions. When prompted to authenticate, click LOGIN TO ZOOM.
You will now need to log into your Zoom account using your Zoom email address and password. Once entered, click Sign In.
Once signed in you may be prompted for authentication, click Allow.
Returning to the StudioEdge interface, you will now see that Zoom has been authenticated, and will see a list of available meetings. Select one of the available Meeting slots. Meetings that are available will display as 'Disconnected'.
You will now have two options available for introducing a Zoom caller, these are as follows:
- Hosting a Zoom Call: This option allows you to create a Zoom meeting within StudioEdge, and provides you the ability to invite Zoom participants using a shareable Zoom URL. This is the recommended option for introducing Zoom callers.
- Joining a Zoom Call: This option allows you to join an existing Zoom meeting, this could be a meeting you have initiated on your Control PC, or if you are joining a meeting that an organizer has created/scheduled.
Signing In to Multiple Zoom Accounts
StudioEdge supports the use of multiple Zoom accounts simultaneously, allowing you to host separate Zoom meetings across different channels.
When you sign in to Zoom on a channel, StudioEdge will automatically use the same Zoom account for any additional channels where Zoom is selected.
To sign in with a different Zoom account on another channel:
Sign in to Zoom on the first channel as normal.
On the next channel, select "Login to Zoom". This will automatically log into the same Zoom account as the first channel.
Select Logout.
Select "Login to Zoom" and then sign in using the different Zoom account you want to associate with that channel .
Repeat this process for each additional channel, logging out and signing in with the appropriate Zoom account as needed.
Once each channel is signed in to its respective Zoom account, you can host multiple Zoom meetings concurrently using those separate accounts.
Hosting a Zoom Call
Click HOST to initiate a new Zoom meeting.
Your Zoom meeting has been created. Copy the Invite Link, and share it with the participants you wish to invite to your Zoom call.
Once participants have joined your Zoom call, these will appear in the caller selection box. Please note, you may need to press the Refresh icon to refresh the participant list.
From the list of participants, select the second Zoom caller, then click ADD CALLER.
Active Speaker
Active Speaker View automatically displays the participant who is currently speaking as the main video in a Zoom meeting. Zoom detects the loudest audio signal and switches the main video feed to that participant.
This view helps meetings stay focused on whoever is talking without requiring manual switching.
You also have the ability to output the Active Caller. To do this, simply select Active Speaker in the drop down-menu within the StudioEdge Portal.
Important Notes
Background noise (typing, coughing, etc.) may occasionally trigger a switch in the active speaker.
If multiple people talk at once, Zoom may switch between speakers.
Muted participants cannot become the active speaker.
ScreenShare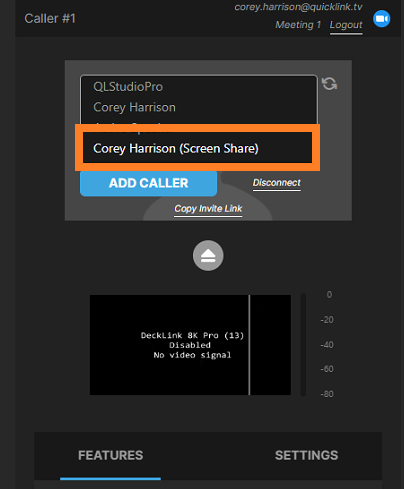
Screen Sharing allows a participant to display content from their computer, such as applications, documents, presentations, or their entire desktop, to everyone in a Zoom meeting. This feature is commonly used for presentations, demonstrations, collaboration, and troubleshooting.
A screenshare option will appear in the participant list once the guest is sharing. Select the screenshare option and then press add caller to pull the feed.
The person sharing can choose to share:
An entire screen – everything visible on their monitor
A specific application window – only one program (for example, a presentation or browser)
A portion of the screen – a selected area
Whiteboard or collaborative tools (if enabled)
Once screen sharing begins, the shared content becomes the primary view for participants.
Starting a Screen Share
To share your screen in a Zoom meeting:
Click Share Screen in the meeting toolbar.
Select what you want to share:
Your entire screen
A specific application
A browser tab or window
Optional) Enable additional options such as:
Share sound
Click Share.
Your selected content will then be visible to all participants.
Important Notes
Only one participant can share at a time unless simultaneous sharing is enabled.
Notifications may appear if another participant requests to share.
When sharing your entire screen, all visible content and notifications may be displayed.
Screen sharing performance may vary depending on internet connection and device performance.
You have now successfully added a second Zoom caller to StudioEdge. Repeat this for as many Zoom callers as you wish to add.
Each time a Guest joins or leaves you will see a Toaster notification and hear an audio alert. There is an option to disable the audio notification in "Settings"
Joining a Zoom Call
To successfully create or schedule a Zoom meeting, and apply the correct Host permissions, please refer to the Creating/Scheduling a Zoom meeting article. If you organization is using a organizer to schedule Zoom calls, please share the above article.
Once you have your Zoom meeting created/scheduled, and wish to begin your workflow. Paste your Zoom meeting link into the Meeting Link box. This Meeting Link could be a Zoom meeting that has been initiated on your Control PC, or it could be a Zoom link that has been shared with you. Once entered, click JOIN.
Within the Zoom call, A participant named 'QL StudioPro' will join.
Once approved, you will be receive a message requesting to record the Zoom meeting, click Approve. Alternatively, if you have been shared this meeting link, a Host or Co-Host will need to approve recording. Please note, for StudioEdge to work successfully, this prompt will need to be Approved. Failure to Approve this prompt will result in StudioEdge not functioning.
Returning to StudioEdge, from the participant list, you will see a list of all users within the Zoom call. Select the Zoom caller you wish to assign to the channel, then click ADD CALLER. Please note, depending on your Zoom account settings, the Zoom host may need to Approve participants to join your Zoom meeting.
You have now successfully brought the Zoom caller into your StudioEdge channel, and a preview of your Zoom caller will appear.
If you wish to add another participant from the same call, from another StudioEdge channel, click the call button ( ), then select Zoom.
You may need to authenticate your Zoom account for this new StudioEdge channel, click LOGIN TO ZOOM and then Allow when prompted.
From the available Meeting slot options, select the slot selected previously. This should now display as Connected.
From the list of participants, select the second Zoom caller, then click ADD CALLER.
You have now successfully added a second Zoom caller to StudioEdge. Repeat this for as many Zoom callers as you wish to add.
Each time a Guest joins or leaves you will see a Toaster notification and hear an audio alert. There is an option to disable the audio notification in "Settings"